How to perform the phaco of your dreams
A master of surgery details the steps to the dream surgery for trainee surgeons
 Performing a vertical chop
Every cataract surgeon, especially when they are learning, would like to perform the perfect phacoemulsification. While a pessimist might say that anything can go wrong, it’s important to remember that with careful planning and preparation, things can go right.
Richard Packard MD, FRCS, FRCOphth, Senior Consultant, Arnott Eye Associates, London, UK, explained the steps that can be taken to ensure that everything goes smoothly in the operating room in the best of all possible worlds.
“You want to have the correct patient, the correct eye with the correct lens and expected refractive outcome on the operating table in front of you,” Dr Packard said at Pearls for the Young Cataract Surgeon, a Symposium organised by the Young Ophthalmologists Committee at the 23rd ESCRS Winter Meeting in Athens, Greece.
“You also need the right sort of cataract – a good red reflex, a 2+ nucleus, no zonular issues, normal axial length and also a cataract that’s not too hard, not too soft, and therefore it’s easy to chop and crack because that’s the one that’s going to be your dream phaco.”
The pupil must be well dilated, the patient needs to be calm, the surgeon should be sitting with a straight back, not hunched or stretched, and thus comfortably.
Following a perfect, self-sealing incision and a perfectly rounded and centred capsulotomy, the machine settings for removing the nucleus must be right
.
“If you are chopping on the Centurion, you want to have the intraocular pressure set at about 50mmHg, you need the vacuum set at about 450mmHg and the aspiration flow rate at 30cc per minute.” Using the torsional method, Dr Packard recommends a microburst setting with 35 milliseconds of on time, 40 milliseconds of off time, with 100% torsional power with a standard, Kelman tip, or 60 with a Balanced tip.
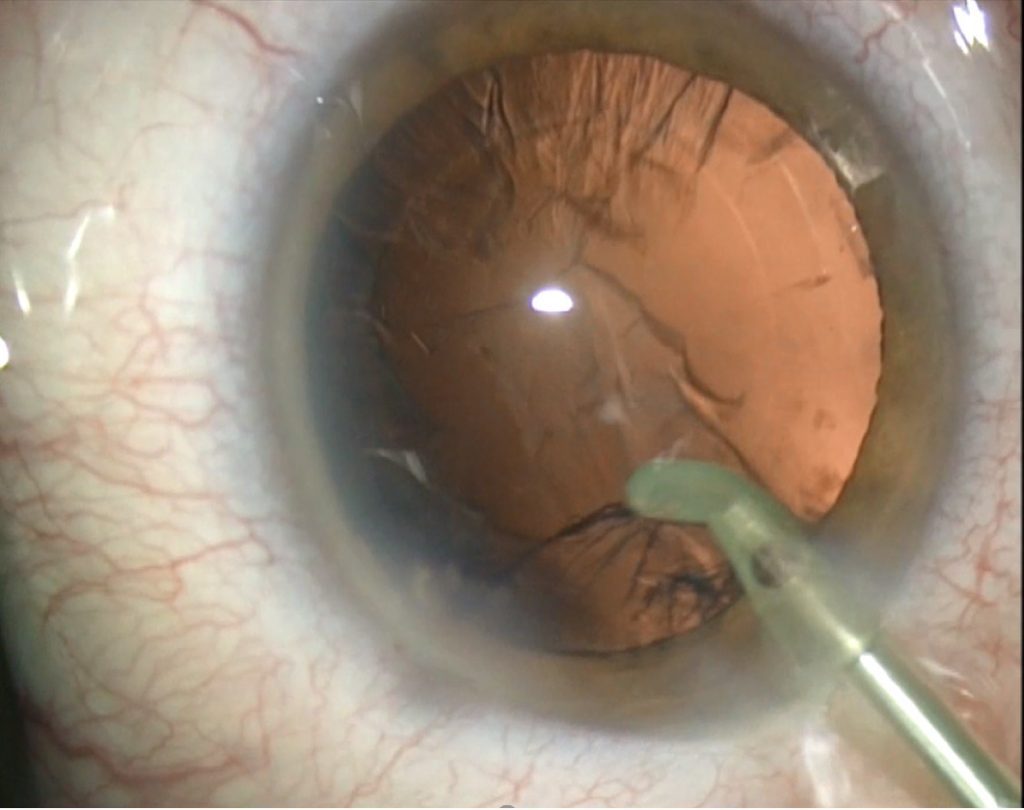
When it comes to the chop, bury the tip at sufficient depth using foot position 3. Then move to position 2, which will allow the vacuum to build to its preset maximum, at which point you can chop down to the left of the tip and bring the chopper centrally with the left hand. At the same time lift with the right hand this will create the chop (Fig. 1). Rotate the nucleus and make further chops until the nucleus is divided into easily removeable pieces. Four is sufficient for a medium nucleus six or eight for a harder one. “The nice thing about torsional I like, is that the pieces tend to stay near the tip, and they don’t bounce away too much, which means that you’re not going to damage the endothelium,” says Dr Packard.
When performing a four-quadrant nucleofractis, or divide-and-conquer technique, it is important to use just enough power that there is no nuclear movement. It is also important that the bevel is exposed at all times, so if using a Kelman tip it is necessary to drop your hand because of that tip’s curve. He also recommends that you lift the tip after the halfway point, otherwise you run the risk of boring into the posterior capsule. Once the cruciate trenches have been created the nucleus is split by placing the long axis of the trench so that it divides the angle between the phaco tip and sideport instrument. These two are then placed at the bottom of the trench and separated so as to create equal and opposite pressure. The cracked pieces can then be removed using the same settings as above.
Using bimanual irrigation and aspiration provides access to the whole of the capsular bag. It is important to aspirate centrally with the port pointing upwards, as pointing downwards creates the possibility of picking up the posterior capsule. If this happens, it is essential not to move it. “Just take your foot off the pedal. This will release the vacuum, and then you will be able to get away without breaking the capsule,” Dr Packard suggests.
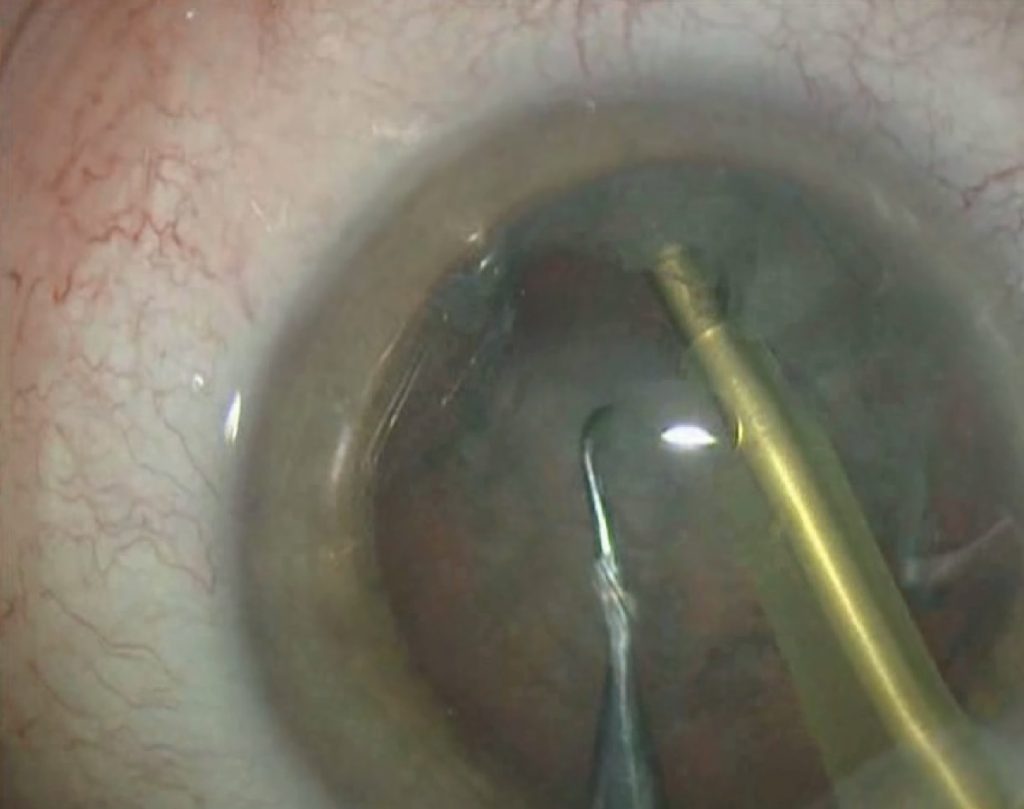
 Removal of the sub-incisional cortex. Courtesy of Richard Packard MD, FRCS, FRCOphth
He also recommends removing the cortex underneath the wound first if you are using a coaxial I/A handpiece (Fig. 2): “This is because the cortex and epinucleus will be holding the bag open, so it gives you best access to the cortex underneath here.”
The next point of the procedure is insertion of an intraocular lens. Dr Packard creates a two-chamber eye, first by filling the capsular bag with OVD and then filling the anterior chamber. This means that when the lens is inserted, it will drop into the bag. If OVD is inserted at the wound, the bag will collapse, making insertion more difficult.
At this point, ask your patient to look toward you as you dock the tip of the injector, which will provide counter traction, allowing the lens to slide easily into the eye. Once it is in position, remove the viscoelastic and close the wounds, preventing the chamber from collapsing. Once the chamber is stable, inject some intracameral cefuroxime and a drop of povidone-iodine.
“Now it’s time to wake up and make your dream come true,” Dr Packard finished.
Richard Packard: mail@eyequack.vossnet.co.uk

Authors
Aidan Hanratty
Published
Friday, July 19, 2019
Category
Phaco Fundamentals
Tags